You can read all the tutorial! Check out the parts A,B,C,D! ENJOY!
| Clean beautiful online store layout. Part D |
Clean beautiful online store layout. Part C |
||
| Clean beautiful online store layout. Part B | Clean beautiful online store layout. Part A |
Hi.
This is supposed to be a tutorial about how to create an awesome online store layout using Photoshop.
But since I don’t have the time to write it entirely right now, I will split it into more tutorials.
This is the final result:

This layout will be splitted into 4 parts, each part will be widely explained and written, so you – guys - can understand better.
PART A

PART B

PART C

PART D

PART E

In the previous tutorials I have shown you how to create the parts A & B. You can find them here (A) & here (B) , if you haven’t read them yet.
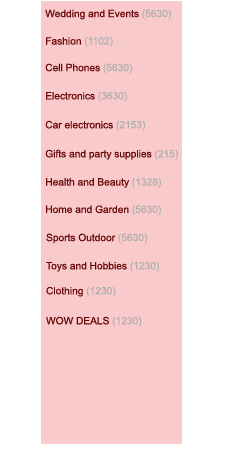
Today I’m gonna show you how to create part C, which is this cute little pinkish/redish menu J:
So let’s get started:
Grab the Rectangular Marquee Tool (M), make a small selection and fill it in with a gradient using the following settings:


Grab the Text Tool, set the foreground color to #FFFFFF, and the font to Arial, size:14 px and write “All Categories” as I did!

Now grab the Elliptical Marquee Tool and select a little circle, then hit Delete. You should have a nice little circle now:

Now with the help of your Pen Tool draw a nice small triangle as shown:

Note:Before every step, don’t forget to create new layers and name them appropriate, in order to find them easily when needed!
Create a new layer, select the Rectangle Tool (U), set the Foreground Color to #f9cacb ,and create a rectangle with the width equal to the one created at the previous step, but much much higher:

Let’s add the dotted lines and the text:
The style used for the text is Arial / Regular / 10pt / Strong . #69080a & #afafaf.
In order to create a dotted line in Photoshop you need to:
Press F5 to bring the Brushes Panel on:
Now select your brush size to 1 px:

Uncheck Shape Dynamics and Smoothing.

Set the spacing to 400%...

Now create a new layer, click wherever you need the dotted line to start, and holding down the Shift Key ,drag the mouse until you have the coursor on the finish point of your line:

The color used for the dots is #C3C3C3.
By now you should have something like this:

Now the easy part comes in:

Add a pic and some text and you’re pretty much done! J
EnjoyJ! This is the third part of my tutorial. If you haven’t read them yet, you can check up on the first part HERE and the second part HERE.
Hopefully I will be able to create the next one sooner than I did with this oneJ
Thx for reading my blog.
Bye.
You can read all the tutorial! Check out the parts A,B,C,D! ENJOY!
| Clean beautiful online store layout. Part D |
Clean beautiful online store layout. Part C |
||
| Clean beautiful online store layout. Part B | Clean beautiful online store layout. Part A |
No comments:
Post a Comment